LIVING STONE MASONRY
  • Home
  • Workshop
  • Gallery
    • Before/After
  • Blog
  • Contact
  • Videos
  • Mission
  • Testimonials
  • About Me
  • Instructional
    • Glossary
  • Links

How to build an outdoor fireplace.

2/2/2013

98 Comments

 
I have noticed that one of the most common search terms I see is "how to build an outdoor fireplace?"  Well, you have found the answers.  The good news is building an outdoor fireplace is simpler  and safer than building an indoor fireplace.  You don't need to put a hole in your house, install a damper, and if you have a chimney fire, there is no risk of your house burning down.  That being said, you should always consult a professional before you attempt to build a fireplace in your backyard (or any yard).
Picture
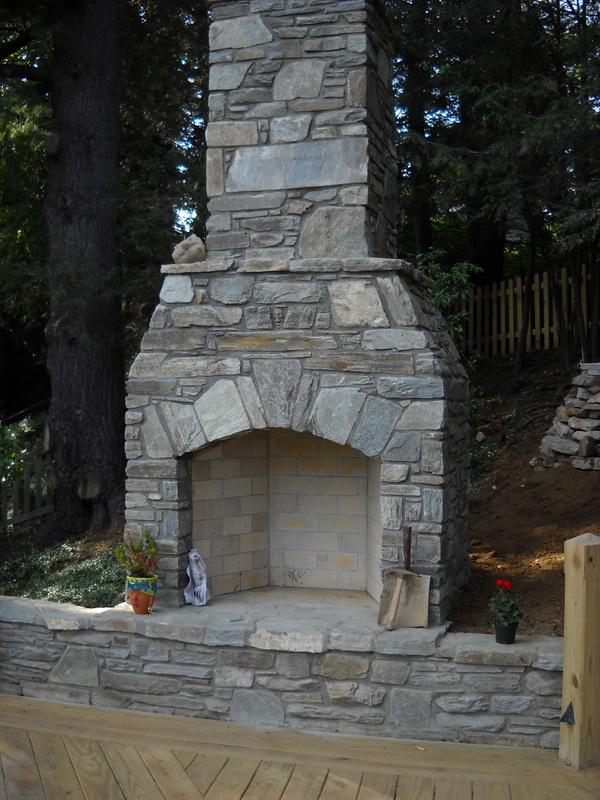
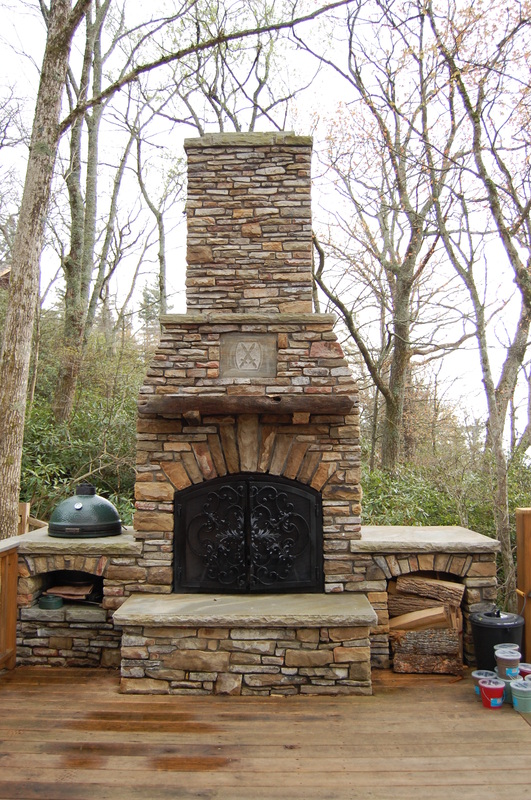
This outdoor fireplace in Boone, NC makes this deck feel more like an outdoor living room.
STEP 1: EXCAVATE AND POUR FOOTINGS.
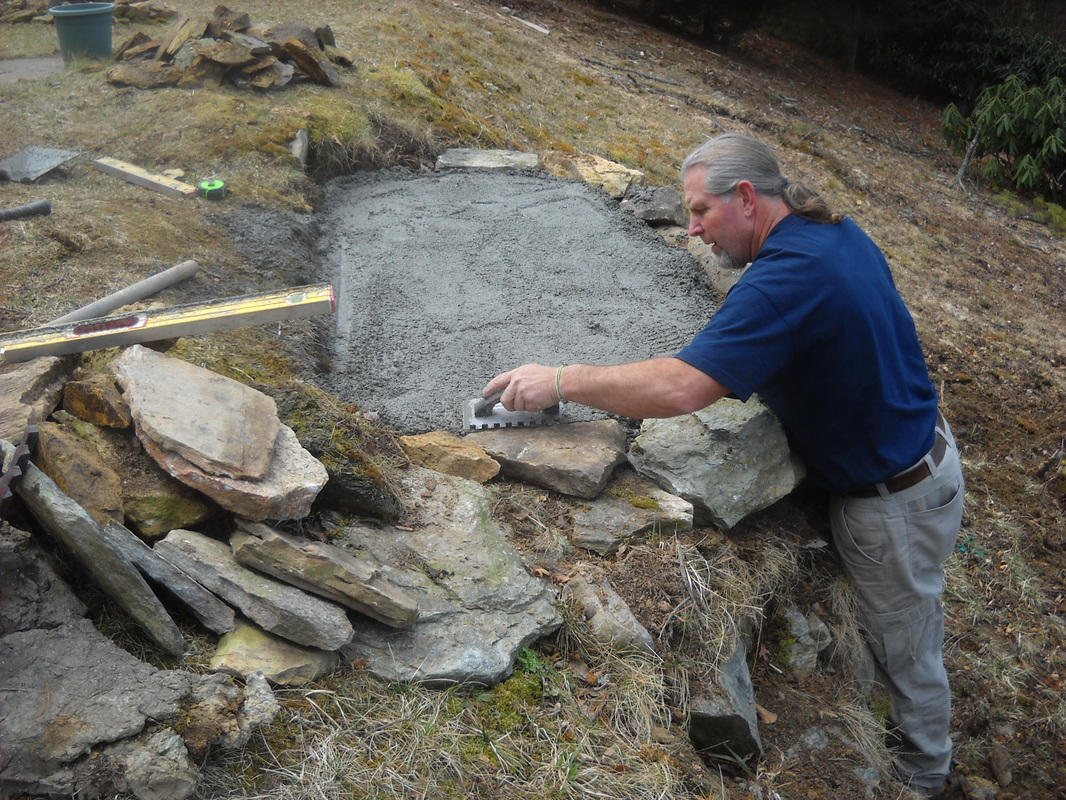
Once you have decided where to put your outdoor fireplace, the first step is to excavate (DIG) for your footing.  While this is not fun, it is very important that you construct a solid footing because your fireplace will be REALLY HEAVY.
I recommend placing rebar at intervals of 1-2' to increase the strength of your footing, then pouring concrete 8" thick.  Consult your local building codes for the appropriate depth of your footing.
Picture
We were lucky enough to pour this footing on top of a rock outcrop for a true stable footing.
STEP 2: BUILD A BASE AND FIREBOX
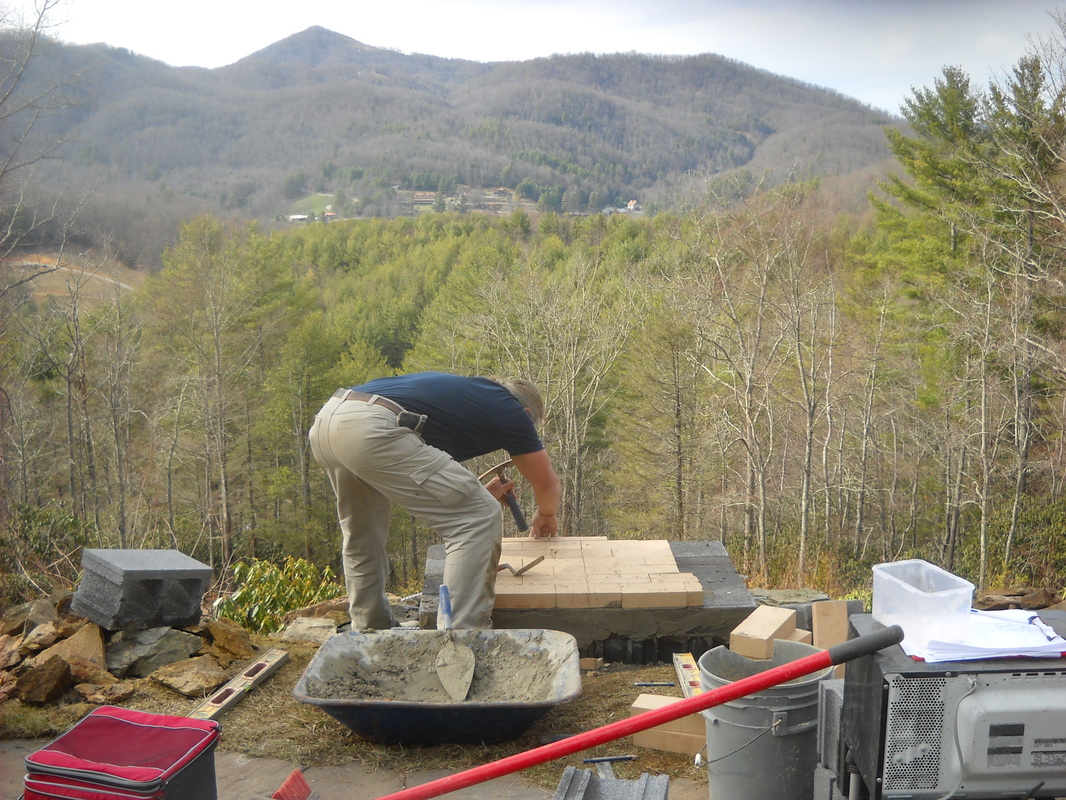
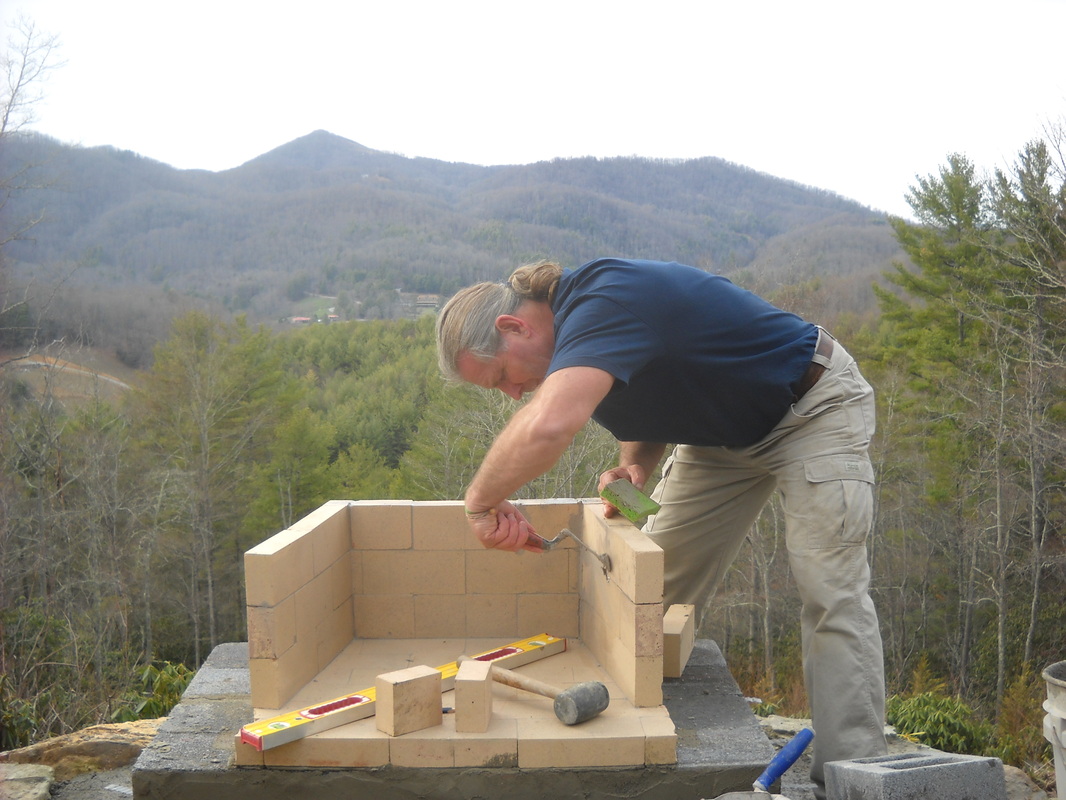
Once your concrete footing has cured for 24 hrs or more, you will need to build a level base on which to construct your firebox.  I suggest 4" solid block for this purpose.  Next you will build your firebox to whatever size you have chosen using firebrick and refractory cement from your local masonry supply.  It is important that you keep all surfaces of your firebox level, plumb and square for it to look correct..
Picture
Picture
STEP 3: BUILD THE THROAT.
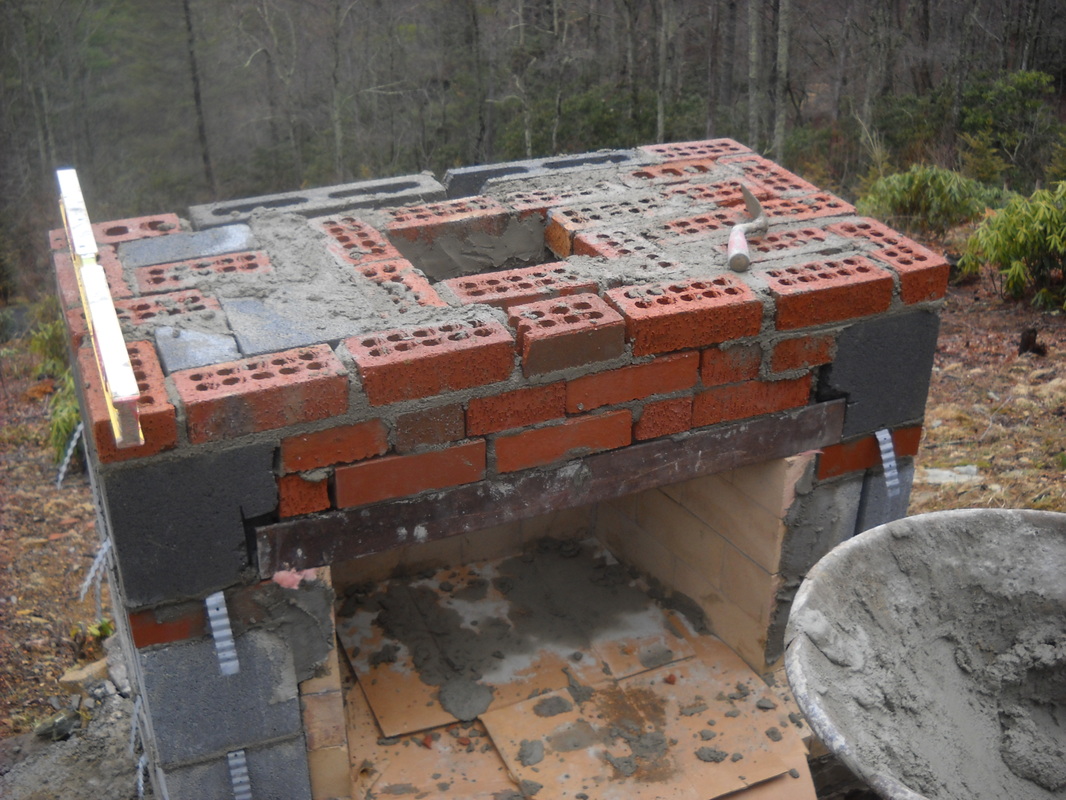
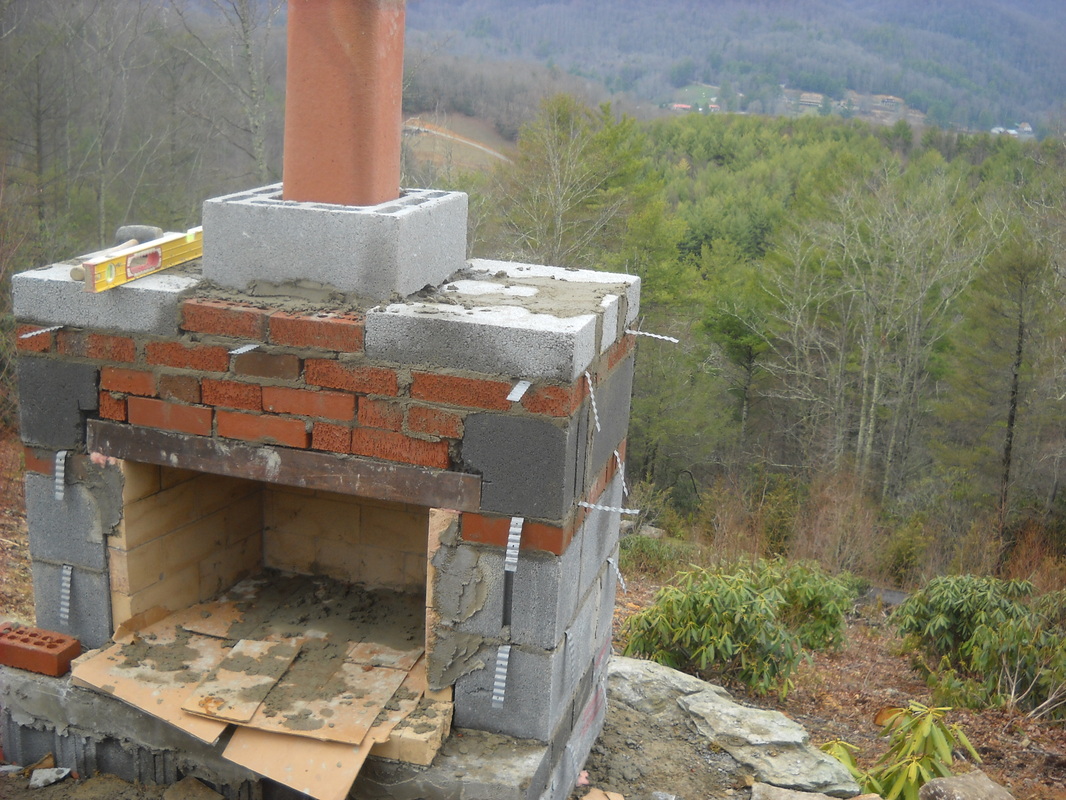
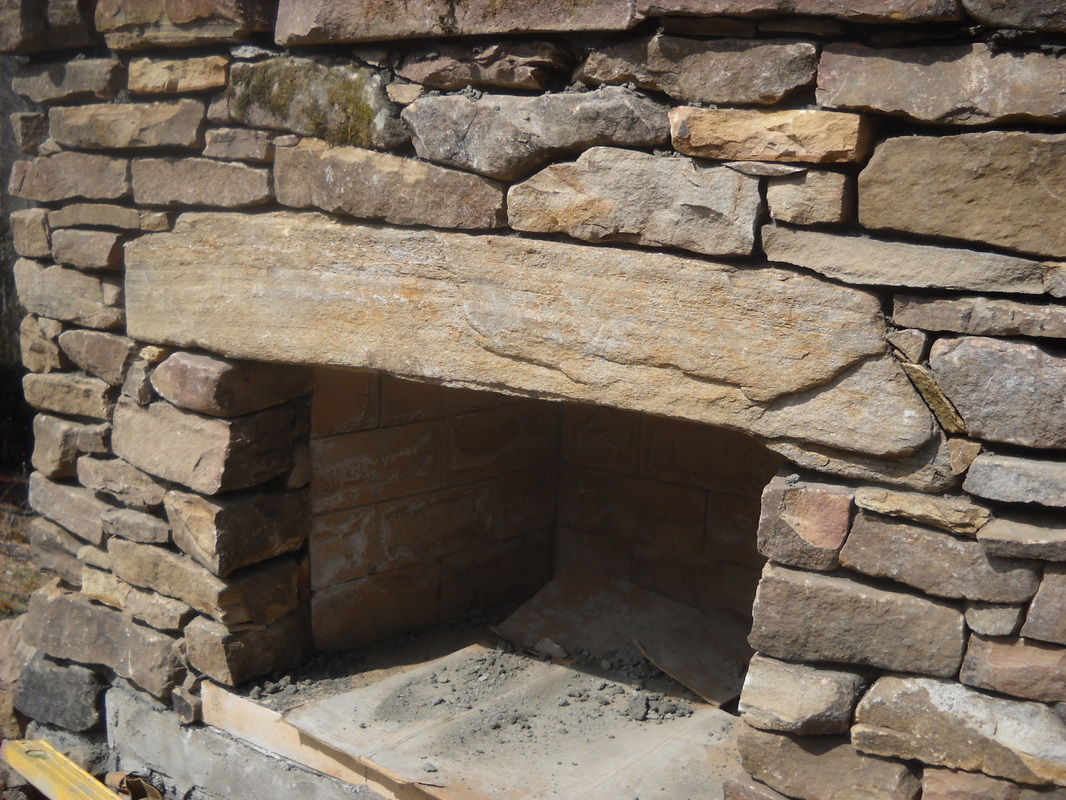
Once you have completed the firebox and allowed the mortar to set, it is time to set your block around it and build the "throat" (where the firebox tapers in to the size of your flue liners).  This involves the difficult technique of "corbeling" (overhanging the brick so they step out at each course).
Picture
As you can tell this is really MESSY.  So if are a a neat freak, I wouldn't try this.  I wouldn't even WATCH someone try this.
But here you can see all the components are in place to build the flue and set stone.  You will want to use a steel angle iron to carry the weight of the masonry over the firebox.  Also, place galvanized wall ties in the joints between the block because its way easier than drilling holes and attaching them later.  As you step each row of brick in over the firebox, build masonry above it to counter the weight of the overhang.  Repeat until you have reduced the opening to the size of your flue liner.
STEP 4: BUILD THE FLUE
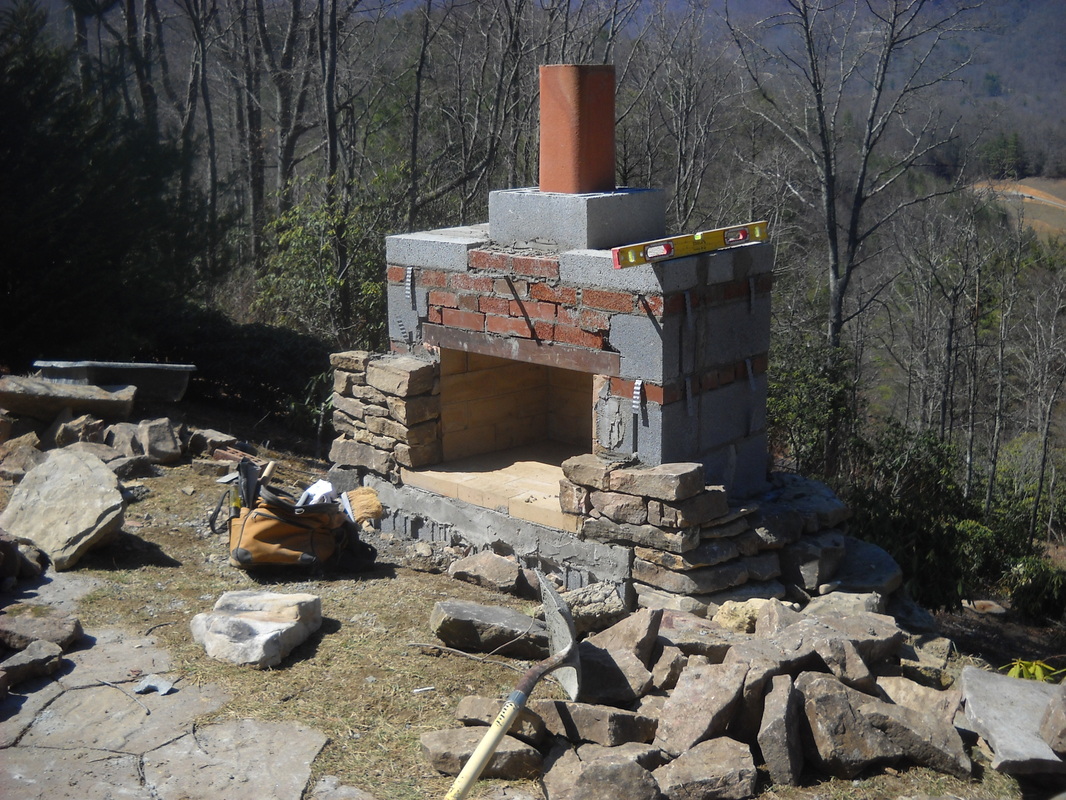
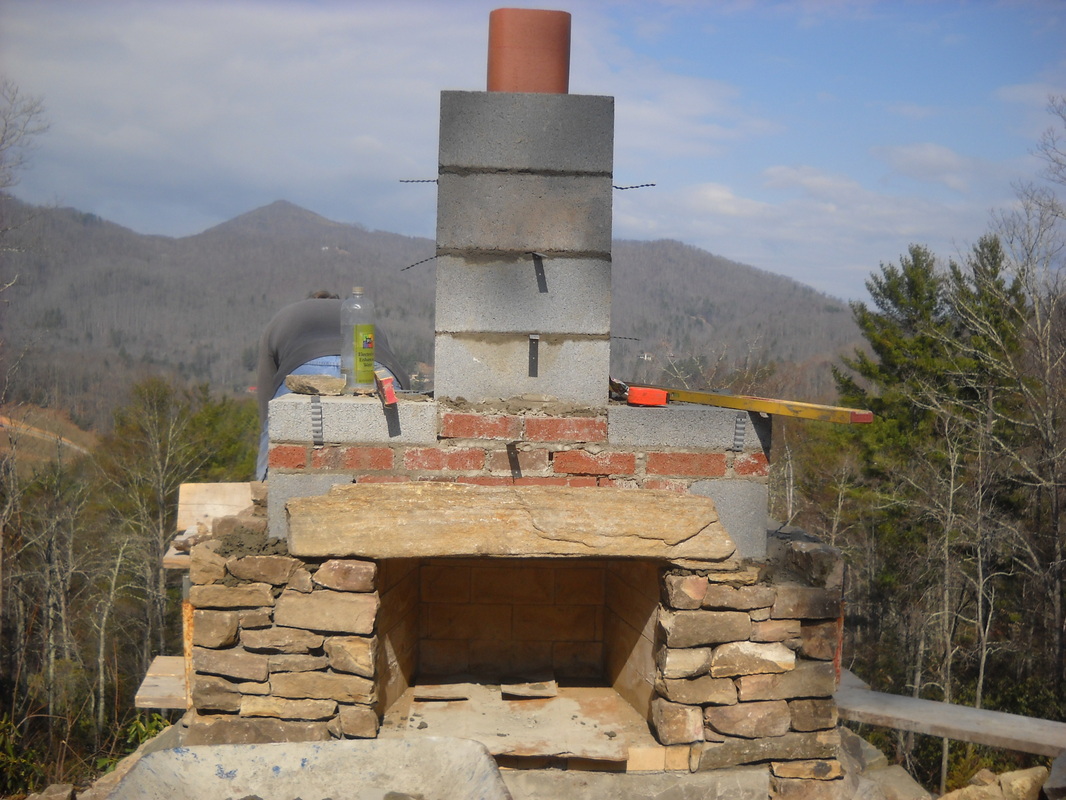
This is the easy part.  Set your first liner in a bed of mortar, then slide a flue block over it.  Repeat until you reach the desired height.  And keep it plumb.
Picture
Picture
STEP 5: STONEWORK.
This is the fun part.  By this point you have chosen your stone and the style of stonework.  I recommend building your stone veneer 6-8" thick to accommodate a variety of shapes and sizes.  Set each stone in a bed of mortar, and fill the spaces between and behind the stones with mortar.  Once the mortar dries (1-4 hrs) rake it from the joints and brush it smooth.  Follow the principles of 1 stone over 2 and 2 stones over 1 for best results.  Look for a long stone to be a "lintel" over the firebox, or learn to build an arch (future post).  Or you can put a piece of steel to support the stone.
Picture
Picture
I hope you have enjoyed this lesson on building an outdoor fireplace, and contact me if you have any questions, or to find a professional near you, visit http://stonefoundation.org/membersusa.html.
Picture
98 Comments
mclainsmom link
5/24/2013 10:25:20 pm

Thank you for this tutorial!!! This is exactly the information I have been trying to find. These outdoor fireplaces are gorgeous! My husband has no more excuses :)

Reply
Reginald
7/1/2013 04:06:52 am

After building the firebox.....how did you get the bricks to lay across the top of the firebox? It seems as if the firebox bricks would be too small to fit across the top of it so that the bricks could lay across the top.

Reply
Brian Aeilts
8/12/2013 10:36:25 pm

Im interested in the very same question, What does the roof of the firebox look like and how are they supported? Thank you

Reply
Reginald Allen
8/14/2013 05:33:38 am

Hey Brian...a friend of mine told me you can make a flat piece of concrete to your fittings made out of 2x2's or 2x4's and plywood to support the blocks/bricks across the top. I've started building an outdoor fireplace made out of concrete block. I don't know if you know this but they have the pre-fabricated fireplaces for sale at www.firerock.com. Those are cool as well but a lil pricey for a 36" fireplace.

Mike
5/16/2015 10:03:51 pm

he used a piece of angle iron across top

Reply
Zak jameel
9/19/2015 05:17:34 pm

How do you get the bricks to lay across the top .

Reply
David Burke link
4/25/2021 10:00:09 am

I am also interested in creating the top. One thought I had was to use re=bar to support the top.

Reply
mike link
3/10/2023 08:31:42 am

Roof of firebox is corbelled brick, usually 1/2" projected out (technically "in" in this case) over the preceeding course of brick. After a few courses of corbelling it creates a roughly funnel or dome shaped roof. Like he said, not easy to do. There is different ways to do the throat including prefabbed ones but he went old school and incrementally projected the brick towards the center of the firebox opening to decrease the opening size. Difficult to show in a picture.

Jim Manis
2/21/2022 04:05:38 pm

I too am interested in the fire brick roof. How does it hold a load

Reply
Reginald Allen
8/14/2013 05:39:35 am

Hey Brian....a friend of mine told me you can make flat piece of concrete out of 2x2's or 2x4's and plywood to support the blocks/bricks goin across the top. I've started building an outdoor fireplace made out of concrete block. I don't know if you know this but they sell pre-fabricated outdoor fireplaces at www.firerock.com. Those are cool as well but a lil pricey for a 36" fireplace.

Reply
Pat Gillen
9/27/2013 06:55:39 am

Where could I get plans for building something like this? Any idea?

Reply
REGINALD ALLEN
9/30/2013 01:27:10 am

Hey Pat.....you can google firerock fireplaces to get the plans on pre-fabricated outdoor fireplaces. Their expensive though. I've started building on out of concrete block. I just started a couple of weeks ago and it's coming along nicely. the inside of the firebox is composed of firebrick from the Elgin Butler Company. And as I stated the exterior of it is concrete block. I'm trying to have this done by next month so we can enjoy it the winter. However, in Texas we really don't get much of a winter. I will post pictures once it's complete.

Reply
Jon Holloway
10/31/2017 02:33:02 pm

I would also like to know where I could find plans... or a book .. or both.

Reply
mike sides
10/2/2013 09:20:51 pm

what are the outside dimensions of your fireplace. What size did you build?

Reply
Reginald Allen
10/4/2013 03:56:55 am

The opening is 36" high. I started out by creating a concrete slab. I dug up 4 in the ground 5'x5' and then added a few bricks and rebar for extra reinforcement, then added the concrete. To give the fireplace some heighth, i layed 2 layers of concrete block (cmu's 8x8x16). Then i have been building the outer housing of the fireplace with the block and for the inside base i created a concrete floor for support of the firebrick i bought from the Elgin Butler Company. They only have yellow and red for the firebrick. The handyman magazine has one in their nov. 2009 issue for you to view.

Reply
Doug link
10/30/2015 06:25:08 am

How many blocks and bricks dose it take to build a fireplace

Joe Allen link
10/11/2013 08:03:26 am

The corbeling seems to be the tricky and skilled part.How far does each course step in and do you lentils and rebar?

Reply
Eric
11/4/2013 11:03:14 am

Pricey prefabs; I can't justify that. Using cinder blocks, then putting bluestone slabs as base. Then the firebox. Is this okay? I was told the bluestone will eventually crackbecayse of the heat. Is that correct?

Reply
Reginald Allen
11/6/2013 01:05:09 am

The base is surrounded by cinderblock with 4 courses. the chimney is 2 courses of cinderblock with a 13" galvanized pipe inside. The inside of the housing I used firebrick.

Reply
Reginald Allen
11/6/2013 01:03:19 am

The base is 2 levels of cinderblock. Then I made the base out of concrete with 4 courses of cinderblock surrounding the base. Inside the housing i used firebrick. The chimney is 3 courses of cinderblock with galvanized 13" pipe on the inside.

Reply
Steve link
11/15/2013 12:31:09 am

Great tutorial. What is the minimum height flue/chimney I could use?

Reply
Reginald Allen
11/15/2013 01:24:31 am

The height of the chimney is suppose to be at least 24"

Reply
Reginald Allen
11/15/2013 01:26:03 am

The height of the chimney is suppose to be at least 24" and 18" in width

Reply
Jason F
2/17/2014 12:34:19 pm

Hi, can you tell me how you were able to get the bricks to span the top above the fire box? Is there a diagram showing how this is done?

Reply
Reginald Allen
2/18/2014 07:34:42 am

Hi Jason,
This isn't my personal fireplace but I have been telling people how I did mine. I used an angle iron 3 ft. long to span across the front face of my fireplace. After I made the front face and leveled my cinderblock around the housing, I then made a concrete slab....4 x4 ft. with a hole in the center for the smoke stack.

Reply
Jason f
2/18/2014 11:36:29 am

Thanks for the reply. Can I ask how you reinforce the slab? It seems like it would be holding a lot of weight

Reply
Reginald Allen
2/18/2014 10:48:11 pm

I used mesh wire and rebar

Garry Bowden
8/5/2020 06:51:27 pm

Try using hardiflex (fire resistant, cement) sheet, same as we use in Australia for eaves or wall cladding, supported on a couple of spaced steel angles - same as the lintel. This will support it until the mortar dries. The sheet can remain.

Jason f
2/18/2014 11:37:34 am

Reply
Lydia
4/3/2014 01:06:37 pm

I was wondering what material you use for the roof of the firebox? I am having someone build one for me and he used firebricks for the bottom and the sides, but the "roof" is rebar and than he used concrete board. I was not sure if this is ok and withstand heat. I picture the rebar getting real hot and sagging, and this is holding up the load of the top bricks. I know it's been awhile since you post this, but if you could give me some advice. Thank you.

Reply
Reginald
4/4/2014 12:20:26 am

Well as long as he used a fire retardant morter or concrete, it will be fine. I used a fire retardant concrete roof on mine and then topped it off with more cinderblocks for the chimney

Reply
Patrick M
4/20/2014 11:43:27 am

I have the box portion already built( with concrete block) but I am confused on how and what to do next and what to use to build from this point up. If it will help I can repost and add the measurements of my firebox. Thank you to anyone that can assist! If anyone knows of a web site with step by step directions and or a video on how to build a concrete block outdoor fireplace from the bottom up I would appreciate it. Patrick

Reply
Reginald Allen
4/22/2014 01:11:12 am

On top of the box portion you have already built, you should use angle iron to fit across the top of the box. Then you should build at least 2 more rows of concrete block topped off with a 4" concrete slab to finish the chimney part of it. After the chimney is built, make sure you buy a chimney cap (spark arrestor) to install on top of the chimney.

Reply
Ronnie
7/23/2014 12:16:36 am

Hi there,
I recently had an outdoor fireplace put in. We requested that it would be slightly shorter so it has a 3'x3' opening but the chimney is not as tall. Could this be the reason the smoke is coming out at us? It's 7.5' tall or should he have made a slant inside? Thanks in advance.

Reply
Reginald Allen
7/31/2014 01:37:35 am

Hello Ronnie......I do know the chimney has to be 15 - 20 tall. You would also need galvanized pipe inside the chimney flue. As far as the inside firebox area....it really doesn't matter if the box is slanted or not however i think 4 ft is a little better than 3 ft. Is there a chamber in the front of the firebox? Meaning is there at least 18 in. of chamber from the top of the firebox to the chimney?

Reply
Reginald
7/31/2014 01:38:26 am

15 - 20 inches

Jason
8/28/2014 05:46:19 am

I am in the process of building very similar fireplace. I used cinderblock and and facing with stacked stone and mortor.

QUESTION-
Above the firebox.... where do you get a steel angel iron? How big should it be? Should it be galvanized? How much do they cost?

Nice work Reginald

Reply
REGINALD ALLEN
9/10/2014 01:23:50 am

Hello Jason,
Sorry for the delay in responding. As far as above the firebox, I got the angle iron from a place called Westbrook Metals. They have all kinds of metal for your projects. Any metal shop in your area should suffice for your fireplace. If I had known prior, another easier method is to build your own top out of concrete instead of using the angle iron. Then you can build your chimney stack right on top of the concrete slab. In any case, the length of angle iron should be about 2 in. longer than your firebox opening. Part of the angle iron will rest on your cinderblocks. The only thing you'll need to have galvanized pipe for your chimney flue. It has to be at least 15 in. in diameter to draw the smoke upward through the chimney and not out the front of the firebox. The heighth of the galvanized pipe should be at least 2 ft. My angle iron cost like $25 and my chimney flue cost $15. Good luck with your project.

Reply
REGINALD ALLEN
9/10/2014 01:23:55 am

Hello Jason,
Sorry for the delay in responding. As far as above the firebox, I got the angle iron from a place called Westbrook Metals. They have all kinds of metal for your projects. Any metal shop in your area should suffice for your fireplace. If I had known prior, another easier method is to build your own top out of concrete instead of using the angle iron. Then you can build your chimney stack right on top of the concrete slab. In any case, the length of angle iron should be about 2 in. longer than your firebox opening. Part of the angle iron will rest on your cinderblocks. The only thing you'll need to have galvanized pipe for your chimney flue. It has to be at least 15 in. in diameter to draw the smoke upward through the chimney and not out the front of the firebox. The heighth of the galvanized pipe should be at least 2 ft. My angle iron cost like $25 and my chimney flue cost $15. Good luck with your project.

Reply
tsagedar
10/21/2014 03:18:54 am

I really like your fireplace. As an inspiration for other add video of your fireplace

http://www.youtube.com/watch?v=kyJIf5UaFwM

Reply
Erica
3/26/2015 07:41:40 am

I was wondering if there was a video tutorial?
Thanks so much.

Reply
Patrick
4/29/2015 01:31:56 am

Excellent comments replyies and ideas. I am looking to build an outdoor fire place. My question that I am confused about. Ok you build a slab of concrete on the ground then build the base of the fire place, after you reach the desired height of your firebox, use fire brick to build the fire box, does it have to be angled or can it be square? Then you build around the fire box with cinder block, correct? Once you get to the top of the fire box how do you make the top of it? How do you lay the block across the top? Would a slab of concrete be too heavy? I just can not figure out the best way to do the top of fire box? Do you line the roof of the firebox with fire brick? After the top of the fire box is done then you just place block inward to the chimney? Do you need that clay looking chimney stack then build around it with cinder block? Sorry for all the questions really want to build it right.... Thank you

Reply
Reginald Allen
7/13/2015 03:39:14 am

The firebox does not have to be angled. Mine is square. That is correct the firebox is built out of cinderblock but remember the inside of the firebox is fire brick. As far as the top of the firebox i built a concrete/fire-retardant mix slab. I found out later that i didn't have to do the mix. I just needed to add the fire brick under the slab. Your base is the MOST important thing you want to have for your fireplace. I dug the ground out, at least 8 inches 4x4' wide. Then i added 3inches of gravel & 3 inches of sand. Extra reinforcement of rebar, mesh and some old bricks from the side of my house I had that was extras. As far as the top, the chimney, i used more cinderblock squared off 24 inches high with a galvanized 15" diameter pipe on the inside. OHHH!!! That slab you build for the top of your firebox, make sure you build a circle in the center of it for the chimney smoke to go through it. Sorry, almost missed that important piece of information.

Reply
Karen
5/7/2015 01:53:20 am

A friend of mine is building a similar fireplace and the property is very windy. Any ideas on how to have a successful fire under wind conditions. He is thinking about installing a fan.

Reply
Reginald Allen
7/13/2015 03:41:36 am

The only thing i can think of for that is to put a little fireplace fence in front of the fireplace to help reduce the wind. It will not obstruct it completely. Safety is of great measure here so i would not leave the fire unattended.

Reply
Rick
7/13/2015 02:23:32 am

Hi, I have a couple of questions, I apologize if this information was covered above and I missed it...1.) I know the top of your firebox is a cement slab...should this be covered with some kind of refractory mortar or is the cement being exposed fine? 2.) I would like to try something like this on an existing patio...does it need to be mortared or cemented in place or can it just sit on the patio? I am sure it is to heavy to get knocked over but want to make sure.

Thanks and great info!

Reply
Reginald Allen
7/13/2015 03:46:06 am

I used a mix of concrete& fire retardant mortar. A friend of mine informed me that all i needed to do was use firebrick under the slab, which makes sense. As far as using an existing slab, I wouldn't do it. Your base is extremely important to hold all the weight. I explained that a lil earlier under a reply with Patrick. The base is the single most important thing you want to build reinforced and built sturdy to hold all of the weight from the cinderblocks.

Reply
Randy
10/18/2015 07:16:22 pm

How did you attach the firebrick to the underside of the cement slab? The "roof " of the firebox?

Reply
Stigwort
9/13/2017 07:50:32 pm

Bump: How did you attach the firebrick to the underside of the cement slab? The "roof " of the firebox? My roof is simply cement. Should I paint the cement with high-temperature paint such as Rutland or AW Perkins?

Reply
Reginald Allen
10/30/2015 07:48:10 am

I'm not exactly sure as to how many blocks there are but I would guess about 60. The firebrick is about 50. To get your square across the top near the mantel you must use angle iron across the front, top face of the firebox.

Reply
Greg smith
11/22/2015 03:16:17 pm

I'm building an outdoor fireplace in northern Indiana. The location is on a small hill. The foundation closest to the patio has footers 30 inches below grade but the back footers are only 12 inches below grade. Is this ok or should the back footers be 30 inches below grade also?

Reply
Reginald Allen
11/24/2015 12:27:19 pm

Yes Greg.....your footers are fine. You only need about 8 inches.

Reply
Miranda
4/17/2016 07:52:23 pm

Climb to glory!
10th Mtn

Nice work.

Reply
Nick link
6/29/2016 06:58:18 am

King of Hearths manufactures 3 sizes of pre-assembled fireplaces that include the firebox, lined with firebrick, and the chimney stack. The units are 2 or 3 pieces depending on the size and, as described in the article, they are placed on a concrete slab. From there, they are ready to be veneered with the material of choice such as, natural thin stone veneer, clay brick or manufactured concrete wallstone.

Reply
Craig Simmons
9/11/2016 06:48:53 pm

Can you please email me instructions on building one of these or Web pages or books to buy. I'm very good at masonry work but not sure fireplace design requirements. Thank you

Reply
Reginald Allen
11/7/2016 01:00:09 pm

Hi Craig,
Sorry for the delay. You actually responded on my birthday. I have been ill and now I'm finally able to move around a bit.
As far as web pages or books......thing only thing I used was my imagination and a handyman magazine to put my ideas to reality. I will tell you what I did. First I built a 4x4x6 concrete pad, built extra sturdy. Next, I provided heighth to the fireplace with 2 layers of concrete block, square around the pad. Inside of that I used 4x8x16 blocks to hold the front sitting area and to hold the firebox. I then built a concrete pad to go on top of the block to act as my firebox base. Then I built my walls around the firebox. Next i purchased firebrick to go inside the firebox. At the front part of the firebox I installed angle iron for the hearth. Once I built my hearth with more concrete block, I built another concrete pad for the top that was protruding out about 7 in from the actual firebox. In the center of the hearth of the concrete pad on top, I made sure to leave a 16 in dia hole in the center for the chimney smoke. Then i built a 24 in high chimney stack and topped it off with a chimney flue. It is imperative to install a 14 3/4 in. galvinized pipe inside the chimney flue to promote proper aeration. If not, the smoke will come out of the front of the fireplace. Firebrick mortar is also just as important when installing the firebrick.

Reply
Reginald Allen
11/7/2016 01:38:17 pm

I'm sorry not a 4x4x6 concrete pad. It was 5x5x6 concrete pad reinforced with extra brick, wire, mesh, rebar, and quite a few good sized rocks.

Reply
Andrew Swenson
1/15/2017 05:27:22 am

Hey,
Beautiful work! I am trying to build something very similar to finish off my DIY flagstone patio. Great tutorial, but I have one question:

After you finished the interior firebox made of firebrick, and have the exterior of CMU block, is it filled in between? Between step 3 and step 4, it looks like there would be about a 8" gap between the outter frame of CMU, and the inner firebox of firebrick. Is this filled solid with mortar? Or did you cut block to fit in? Or can you just span over this with the rebar ect as well?

Thanks very much,
Andrew

Reply
Reginald
1/16/2017 07:49:35 am

Yes it is filled with mortar. The inner firebox is filled with fire-retardant mortar. Anything within the firebox should be filled with this type of mortar. Some say you don't have to have this type of mortar because the firebrick is fire resistant. I would just rather be safe than sorry.

Reply
Paris Jones
2/11/2017 05:28:22 am

Great information & instructions here! I'm glad i stumbled upon this. I have a mason who is going to build me one on an existing patio, which is to be screened in a well. I can make sure that no about short cuts are taken whenever this project starts. One are of concern is how i would screen that side in where the fireplace is going to be.

Reply
Reginald Allen
2/13/2017 06:54:09 am

I don't know about screening near the fireplace Paris. It's too much of a risk near the fire. Everybody has their own style and taste when it comes to the fireplace. Me, personally, would just consider a stand alone fireplace. And maybe a seating area along with it. If anyone else has any questions my email address is bucho29@yahoo.com

Reply
Horst from Germany
3/14/2017 12:37:15 pm

Ey Alter, das ist ja voll der Hammer, was du da baust !
Very cool - I love it !!!

Reply
John Halal
4/17/2017 12:09:51 pm

I have a precast concrete fire box. I've put firebrick on the floor. Do I need to add firebrick to the inside of the concrete side walls? Will a wood fire damage the bare concrete?

Reply
REGINALD ALLEN
4/18/2017 02:30:51 pm

I would say yes. The concrete block is not fire retardant. After a while, it will begin to crumble to pieces. So do add the firebrick to the inside of the concrete walls.

Reply
Lorna
6/9/2017 11:19:57 am

I can't find a fire retardant mortar or cement where I live St. John New Brunswick could you tell me where I could find this product thank you

Reply
Reginald Allen
6/9/2017 04:54:06 pm

McCoy's or any private building supply company

Reply
Andrew Swenson
6/9/2017 07:51:40 pm

Reply
Christina
7/27/2017 12:52:12 pm

Reply
Alan Weeks link
7/29/2017 08:53:17 am

Is the top of the fire box "flat" ? And how did you line it with fire bricks ?
Looking at other web sites, the throat has been tapered upward to meet the chimney opening. This seems to be the $1000 dollar question, how is it done ?

Reply
Reginald
7/31/2017 07:08:02 am

The top of my firebox was made out of concrete. I use a quarter bag of regular concrete and the rest was made out of fire retardant concrete mix. I also formed it wide enough and long enough to be used as my hearth. You also have to ensure that when you build it that you have at least a 15 inch diameter hole in the center of it to build your chimney over the fireplace.

Reply
Travis Prange
3/28/2018 08:14:29 am

Reginald, thanks for all the replies. Are you able to provide any pictures for how this part is completed? I'm also trying to figure out how to make a pad of concrete with this, is it just supported from plywood and 2x4's until the concrete dries, then removed? How thick should this pad be? 1-2"?

John
12/31/2017 12:23:33 pm

Where do I find clay chimney flue’s I’m looking for 16” x 20”

Reply
Mark Lane
5/10/2018 11:37:28 am

I'm looking for some advice here. I live in upstate NY and about 5 years ago we had a fireplace built in our yard. I'm going to outline what we did for clarity. The foot print of the fireplace is 5' front to back, 10' long and stands about 15' tall at the chimney. I dug down 5 feet added crushed stone and using 8" block I built a rectangular block wall that came up out of the ground. I then back filled this entire 5'x5'x10' area with concrete. All of this was for the frost that we experience here. There are 2 wood storage bins on each side of the fireplace itself. The tops of the storage bins and the shoulder (area on top of the fireplace box and where the chimney starts were done w/ 3" of reinforced concrete w/ an ogee edge detail. The chimney starts out wide (as wide as the box) and then tapers in. We used real stone veneer (not cultured stone) on the entire fireplace and used a large piece (10"x10"x48") blue stone as a lintel across the fireplace opening. For the cap we cut down 4 pieces of blue stone into 3"x3"x18" legs and placed them in the 4 corners of the top of the chimney and then place a blue stone slab on top of the 4 legs. We have 2 issues that I'm looking for advice on. First, we used stone corners to wrap the edges of the firebox (on the face of the corner and the return into where the fire brick is. The corners are cracking and a few pieces have actually fallen off. I'm thinking we should have just used flats in that spot. What type of material can I use on the returns. I'm thinking a good insulator material that can withstand flame exposure? Any suggestions? Is this what you would do? Other issue is that at the upper parts of the chimney the mortar has cracked and water has gotten into the joints and with our winters that is not a good thing. I believe that the heat from the fires may have caused this cracking. Is there a minimum distance that the block should be away from the flue? I don't know if when we tapered the chimney in did we bring it in too close and the excessive heat caused the issue? I'm thinking that we have to take down the chimney and bring it straight up and lose the taper? Also maybe add a fabricated chimney cap (Copper or Stainless) to keep the weather out? Any suggestions would be greatly appreciated. I can send photos if they would be beneficial. Thank you for your time. Mark

Reply
Ken Askildsen
7/20/2018 10:57:12 am

Hi Reginald,
Great job with that outdoor fireplace! I really like the lintel stone detail.
I noticed the last photo eels to show a different fireplace. Do you have a photo of the completed lintel stone fireplace featured in the tutorial that you can post? I’m up in Connecticut and will be building one on my patio. Thanks again!

Reply
James
10/17/2018 06:12:06 pm

I have an outdoor fireplace with a 16” opening in the center back area, then a 14” metal stack with spark arrestor. At the moment the top is unfinished and when we use it a ton of smoke comes out the front. Thier is no real hearth it’s just the slab ceiling and flat to the front opening. I just thought I needed to give the ceiling part of the box some depth by adding stone across the top hearth. I had fire brick on the ceiling but it all fell off lol. Is thier something important to know when finishing the top like does the 16” stack need to come all the way to the top or can it be lower than the 14” stack and open to the box on top? Also will my stone face hang on or does it need to be angled stones that press each other to stay up?


Reply
Derek McDoogle link
7/17/2019 12:24:15 pm

I like how you said that building an outdoor fireplace is safer than building an indoor fireplace. My parents want to remodel the landscaping from their house and they want to have a fireplace. It might be a good idea to contact a professional to help them bring her idea alive.

Reply
Modus Fireplaces link
8/20/2019 01:18:58 am

Outdoor fireplaces can be breathtaking additions to homes, giving backyards a decorative and functional focal point. Keep up the great work!

Reply
Stefan Bradley link
9/5/2019 08:16:00 am

I appreciate that you elaborated on the fact that your fireplace will need to be reinforced by digging around the area where you plan to install it. When my wife told me that she wanted to install an outdoor fireplace, I became worried that it might fall apart unless it is properly supported. I'll be sure that the fireplace is built on a solid surface.

Reply
Jim Franks
9/10/2019 04:21:15 pm

Is that a 10th mountain division logo on there

Reply
Marcos
12/19/2019 06:43:45 pm

He did a great job the only thing he did wrong is the smoke chamber... it supposed to be like a pyramid, if you do it flat like he did you got a huge chance then smoke will be coming back towards you not up the fireplace, experience Mason with over 20 years in the trade any questions let me know https://images.app.goo.gl/FTAzeudXJUdTVPWPA

Reply
Davis Masonry link
6/10/2020 02:43:41 pm

Love reading about DIY projects. Thanks for all the information!

Reply
Peter Dodgion link
11/22/2020 08:42:44 am

What is the trick tip get the flue to draw smoke. I've got a 8x10 tile flue and half the smoke comes out the front.

Reply
Elliot Keller link
1/12/2021 06:45:41 am

Thaank you for sharing this

Reply
Ginny Sumner
12/26/2021 03:56:07 pm

Hi, I'm inheiritting my grandmother's 200+ year old house. Out on the back cement patio, there's a fireplace attached to the house. I want to refurbish the fireplace so it can be used. I don't believe it's ever been used in my lifetime, or even my mom's lifetime! The stones on the side have been falling and that part might be easy to fix. However, I don't know where to start on the inside. Of, course, I intend to have the flue cleaned, there's likely to be nests in it, but I don't know what step two should be, after cleaning out the fallen debris. I really want to have a protected place to have a wood fire to sit around when it's chilly out! I also read through your instructions but I think only parts will apply since I'm not starting from scratch. I like the grate in the final picture. I'd like something like that on grandma's fireplace. Where can I find one of them?

Reply
Ginny Sumner
12/26/2021 04:07:21 pm

I forgot to ask if there's a special kind of mortar to use on a fireplace that's outside, in western NY? I don't know if there are different types of mortar or if you need to use something special to remortar a fireplace that's likely over 200 years old. I'm hoping you can steer me in the right direction! Thank you!

Reply
brick contractor cambridge ON link
1/27/2022 06:33:11 am

As someone in the business, I have to say the craftsmanship here is a thing of beauty. Things have to get messy in the process to create a gorgeous end product!

Reply
fireplace contractor kingston link
2/4/2022 07:30:33 am

I agree, it's a beautiful construction, but those of us in the business know what goes on behind the scenes to make it last and withstand outdoor elements like rain, hail and snow.

Reply
Max Jones link
4/29/2022 12:17:39 pm

Thanks for the info about building a fireplace. My friend is looking for info regarding stonework. I'll share this info with him as he looks for info about custom stonework.

Reply
Bruce Chalmers
5/2/2022 09:46:31 pm

We live in Novato, CA and we have a beautiful outdoor fireplace. Having problems lately with chimney fires, even after I had a chimney sweep company out and they did their thing. Looking for a professional mason in our area to make the necessary repairs. Can you recommend one in our area? Appreciate your time. Bruce Chalmers

Reply
Mia Evans link
5/11/2022 08:26:22 pm

Thanks for helping me understand that corbeling is a difficult technique wherein the brick would be overhanging so they step out at each course. I guess we need to hire professional masonry contractors instead if we want a successful outdoor fireplace installed in our backyard. It's one of the things we dream of having ever since we bought this house, so we saved up for a year to actually get this dream materialized.

Reply
black chrome hearts hat link
9/26/2022 09:58:15 am

Chrome Hearts is an American fashion brand that was established in Los Angeles California U.S.A. The company specializes in the production of high-quality.
<a href="https://chromeheartshat.store/">chrome hearts trucker hat</a>

Reply
Bape Hoodie link
2/2/2023 12:08:27 am

Thanks for the blog loaded with so much information. Stopping by your blog helped me to get what I was looking for.

Reply
Gallery Dept Hoodie link
2/2/2023 12:13:56 am

This is such a great resource that you are providing and you give it away for free. Thank you :)

Reply
Chrome Hearts Hat link
2/2/2023 09:37:56 pm

Hi, Very nice post. I just stumbled upon your blog and wished to say that I have truly enjoyed surfing around your blog posts. In any case I will be subscribing to your rss feed and I hope you write again soon!. Thank you :)

Reply
Yeezy Gap Hoodie link
2/8/2023 11:38:01 pm

This is just the information I am finding everywhere. Thanks for your blog, I just subscribe your blog. This is a nice blog...

Reply
Bape Hoodie link
2/10/2023 10:51:51 pm

Good This blog website is pretty cool! How was it made!

Reply
Kelly West
8/17/2023 07:10:45 pm

I'm in the process of building a fire place oven combination. You mentioned you filled the void between the two walls of your fire box with mortar. I planned on using a refractory blanket around my firebox and dome oven above it. Will I risk stability if I don't fill it with refractory mortar?

Reply
Christian P link
9/6/2023 07:28:59 pm

Great Tips Keep Helping the Learners my friend!!

Reply


Leave a Reply.

    Franklin Smith

    DSWA certified drystone mason

    Archives

    February 2013

    Categories

    All

    RSS Feed

  • Home
  • Workshop
  • Gallery
    • Before/After
  • Blog
  • Contact
  • Videos
  • Mission
  • Testimonials
  • About Me
  • Instructional
    • Glossary
  • Links